


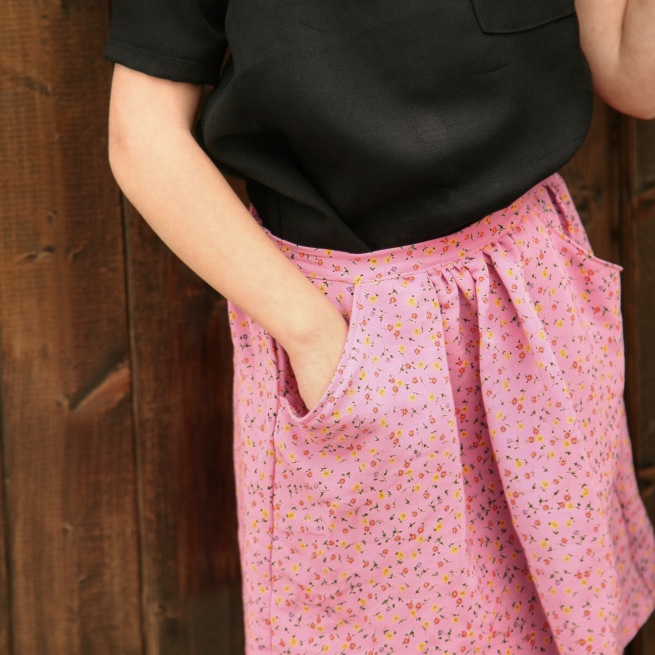


 These girls love skirts and I think one of them squealed when I said, “and look, pockets!” Kids and pockets are like a match made in heaven right? Or maybe it’s only my’n who are constantly collecting rocks and snitching candy.
These were so quick to make and would make a perfect nap-time project. I’ll show you how. You will need her waist measurement and the length from her waist to where you want the skirt to end. I measured my’n right below the knee cap (so they wouldn’t grow out of them so fast).
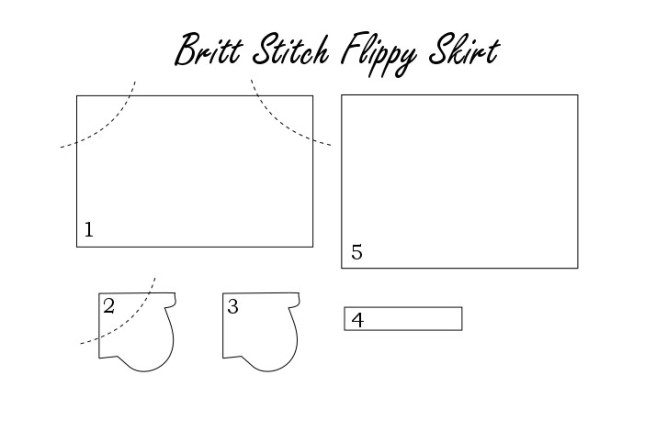
Step 1 – Cut: Cut out the pieces like so: (1.) width = full waist measurement plus 1″ , length = measurement from waist to knee plus 1″. (2 and 3.) cut out two identical pocket patterns out of paper, size will depend on how big you want them for your skirt. On one of the pattern pieces cut along the dotted line where you’re pocket opening will be this will become pattern piece 2. Cut out two of each pocket piece so you have one for each side. Use the rounded triangle you cut off from pattern piece 2 as a guide to cut off your corners on fabric piece 1. (4.) Width= half the waist measurement + 1″, length = 2.5″. (5.) width= full waist measurement + 1″, length = measurement from waist to knee + 3.25″.
Step 2 – Pockets: Sew right side of smaller pocket pieces (2) to right side of skirt piece (1). Trim seam allowance, press and top stitch pocket opening. Flip the skirt over to the wrong side and pin the bigger pocket piece to the smaller pocket piece. Pin right sides together if you’re doing a french seam, or wrong sides together if you are serging.
Step 3 – Front Waistband: Gather front skirt piece and pin front waistband right sides together. Sew together with 1/4″-5/8″ seam allowance and trim (this will end up inside the waistband so no real need to finish it).
Step 4 – Construct Skirt: Sew along the sides of the skirts using a french seam with 1/4″ seam allowance or serging with 1/2″ seam allowance.
Step 5 – Waistband / Elastic: Fold and press 1/4 inch around top of skirt and then fold in to the seam of the front waistband covering the raw edge. Press and pin a casing all the way around. Sew leaving about an inch open right along both side seams of your skirt. Cut a piece of 5/8″ elastic half the size of the waist measurement. Thread your elastic through the back casing and secure it on each side right along the side seam. Sew casing closed.
Step 6 – Hem: Hem skirt to desired length.
They love their skirts and I love how fast they are to make! Did you make this? Tell me how it went! Remember to Pin it for later and come be my friend on Pinterest while you’re at it 😉 @brittstitchhandmade

You are so creative!!
LikeLike